
Spring is one of my favorite times to refresh outdoor spaces and get creative with garden décor. As a new gardener, I’ve fallen in love with the aged look of vintage terracotta planters. There’s just something about the texture and perfect patina of aged terracotta pots that brings a touch of rustic charm to any space. But since I haven’t had the time to collect truly weathered ones, I found a simple way to replicate that aged finish using new terra cotta pots—and the results are stunning!

Last year, I experimented with this fun DIY, and I was so thrilled with how the aged terra cotta pots turned out that I’ve continued using the process ever since. Today, I’m walking you through the easy steps to turn new clay pots into aged terracotta pots using just a few supplies and a bit of time. Whether you’re decorating your patio, filling your greenhouse, or sprucing up a garden bed, this is such a fun way to blend old and new for a more natural look.

Please note: This post contains affiliate links. If you make a purchase via one of these links I may receive a small commission from your purchase. This commission does not add any cost to you but helps me to continue to share new products and ideas with you. Thank y’all for always being so supportive!!
Supplies for Aged Terra Cotta Pots

Here’s what you’ll need for this project:
- New terra cotta pots or planters (available at any garden center)
- Organic garden lime
- Water
- Paint tray liner
- Disposable fork for mixing
- Chip paint brush
- Brown contractor’s paper or protective liner for your work surface
- 120 grit sandpaper
- Disposable gloves
- Optional: matte sealer or clear sealers for a protective coat
You can shop all of the supplies here!
Step-by-Step Instructions for Aged Terra Cotta Pots
Step 1: Mix Your Lime Wash
The first thing you’ll do is combine 1 cup of garden lime with 1 cup of water in a paint tray liner. This lime mixture gives a nice light coat that mimics the natural aging process. If you prefer a heavier texture, use less water to make it thicker—almost like a paste.


Step 2: Prep Your Workspace & Apply Lime Wash
Lay down contractor paper or a liner to protect your surface. Wear gloves to avoid irritation. Dip your chip brush into the lime wash and apply it generously to the outside of the pot, brushing all the way up the sides and a few inches inside of the pot. You can use long horizontal strokes or dab for more texture. The porous clay soaks up the mixture beautifully, and uneven brush strokes help add dimension.


Step 3: Let it Dry
Leave the pots to dry for several hours or overnight. The lime will lighten as it dries, creating that classic antique appearance that gives new pots an aged look.


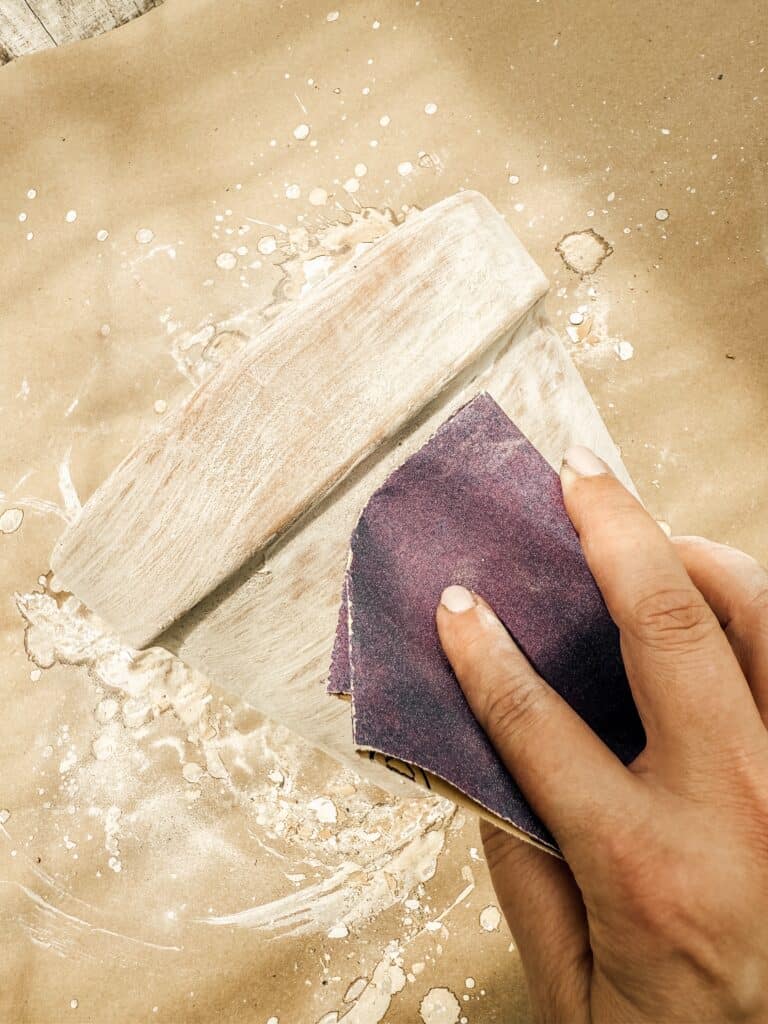
Step 4: Distress if Desired
Using your sandpaper, gently scuff the outside of the pot or different areas to remove any heavy drips or to expose more of the terra cotta underneath. This step is all about preference—you can distress the whole pot or focus on a few spots for subtle wear.
Step 5: Seal the Surface (Optional)
You can finish with a coat of matte sealer for added protection, especially if your pots will live outside year-round. I personally love to leave them unsealed for a more rustic finish that continues to weather naturally over time.
Step 6: Add Your Plants and Style Away
Now comes the fun part—plant your favorite herbs, flowers, or greenery into your aged terracotta pots and style them throughout your outdoor spaces! I love how this technique gives my newer pots a cohesive look with my older finds. They’re especially beautiful displayed in our vintage window greenhouse, and I can’t wait to share the full backyard reveal soon!


Watch the Full Video Tutorial on YouTube

Tips
- For a softer, chalky finish, add a splash of white paint to your lime mixture.
- Try different techniques like layering two coats or wiping sections with a damp cloth for varied texture.
- Focus your application on the outside of the pot, but aging the inside of the pot by a few inches adds a more realistic effect.
- Use a chip brush to create dry brush strokes and avoid over-saturation.
- Avoid sealing the pot if you want it to naturally weather and continue developing character.

Frequently Asked Questions
Can I use any type of garden lime?
Yes, just make sure it’s organic garden lime—commonly found at most garden centers.
Will the lime harm my plants?
Nope! Once dried, it won’t affect the soil or plant health.
Do I need to seal my pots?
You don’t have to. Clear sealers like a matte sealer are great if you want to protect the aged finish, but I prefer the look of raw lime for a more antique appearance.
Will this technique work on old pots?
Absolutely! You can use it on aged pottery to create a more uniform or refreshed look.
How long does the aging effect last?
Unsealed pots will continue to evolve with weather, which adds even more charm over time.

Whether you’re styling terra cotta planters in a greenhouse, porch, or patio, this is such a fun DIY to elevate your outdoor décor. These easy steps make a huge impact, especially if you’re starting with brand new terra cotta pots that have that bright orange color. These aged terra cotta pots are so fun and easy for anyone to make. With this technique, you’ll be enjoying an aged finish and perfect patina in no time!

Pin For Later

Shop this Post


This is such a neat look to terracotta pots, I love the look. I was wondering if when you water the plants doesn’t the lime leach into the soil and affect the plants
Thank you so much! I haven’t had a problem with the lime affecting the plants. With repeated watering the lime may actually wear away but can be reapplied.