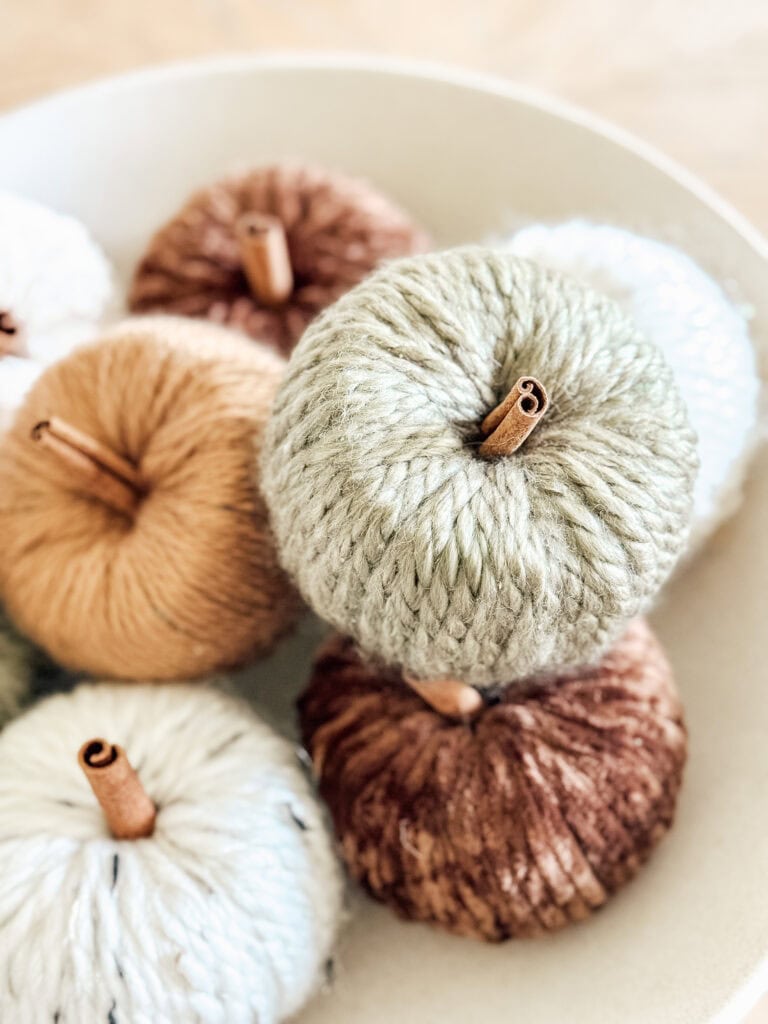
Fall is the season when everything starts to feel cozy again. I love incorporating yarn into my fall and winter décor with blankets and pillows, because the soft texture adds instant warmth and charm to my home. For years, I’ve wanted to try making yarn pumpkins, but I could never find the right styrofoam pumpkins to create the look I had in mind. This year, I decided to improvise and use styrofoam balls instead—and I’m so glad I did! The results are beautiful, textured pumpkins that fit perfectly with my fall color palette. I displayed them on my coffee table, and they look right at home surrounded by other fall accents. If you’re looking for an easy, affordable, and customizable DIY craft for autumn, yarn pumpkins are the perfect choice.
Supplies You’ll Need
To make your own yarn pumpkins, gather the following supplies:
- 3.8” Styrofoam ball
- Yarn (chunky yarn works best for texture)
- Knife
- Cinnamon stick or branch cut to size
- Scissors
- Yarn needle or wooden craft stick/skewer

Shop the Details

Step-By-Step Instructions for Yarn Pumpkins
Step 1: Prepare the Foam Base
Begin by cutting the top and bottom off of the Styrofoam ball. You’ll want to create two flat surfaces on each end so your pumpkin can sit securely without rolling.


Step 2: Create the Center Hole
Using your knife, carefully cut a quarter-sized hole in the center of the Styrofoam, tunneling all the way through from top to bottom. This hole will allow you to loop your yarn through as you wrap it.


Step 3: Cut Your Yarn
Cut a few feet of yarn to get started. Using smaller sections of yarn makes the process easier to manage and prevents tangling.

Step 4: Begin Wrapping the Yarn
Insert the end of the yarn into the hole at the center of the Styrofoam. Hold it securely with one finger, or if you prefer, you can use a dab of hot glue to hold the yarn in place. Wrap the yarn around the outside of the foam, pushing it through the center hole with your finger. Continue looping the yarn until the pumpkin is fully covered.


Step 5: Adjust as You Go
Once the center becomes too tight to push the yarn through with your finger, use a wooden craft stick or yarn needle to guide it through the hole. This will keep the process smooth and prevent frustration.

Step 6: Finish Off the Yarn
When the Styrofoam is completely covered and you’re happy with the fullness, tuck the end of the yarn into the center hole to hide it.


Step 7: Add the Stem
Insert a cinnamon stick into the center hole to create a stem. It will usually fit snugly, but you can secure it with hot glue if you’d like extra stability.
Step 8: Style and Enjoy
Your cozy yarn pumpkin is ready to display! I styled mine as a bowl filler on my coffee table, but they would also look beautiful as part of a fall tablescape or even as thoughtful handmade gifts or party favors.

Subscribe to get all the latest projects delivered Right to youR Inbox!
Tips for Making Yarn Pumpkins
- Chunky yarn creates the best texture and gives your pumpkins a cozy, farmhouse-style look.
- Try using multiple yarn colors for a striped or variegated pumpkin.
- Cinnamon sticks not only look great but also add a light fall fragrance to your pumpkins.
- Use larger or smaller Styrofoam balls to create a variety of pumpkin sizes for visual interest.
- If you want a more permanent pumpkin, secure your yarn ends and cinnamon stick stem with hot glue.

Frequently Asked Questions
Can I use other materials instead of Styrofoam balls?
Yes! You can also use foam craft pumpkins, paper mache pumpkins, or even tightly crumpled newspaper balls wrapped in tape as your base. Styrofoam just happens to be the easiest to carve and shape.
What type of yarn works best?
Chunky yarn is best for coverage and texture, but you can use any yarn you love. Thicker yarn makes the project go faster and gives a fuller look.
Do I need to use hot glue?
Hot glue is optional. I personally didn’t need it because the yarn stayed in place and the cinnamon sticks fit snugly, but if you want more durability—especially if you plan to store them for next year—it’s a good idea.
How long does it take to make each pumpkin?
Each yarn pumpkin takes about 15–20 minutes to complete, making this an easy and quick fall craft project.
Can I use these as gifts?
Absolutely! Yarn pumpkins make adorable hostess gifts, party favors, or small seasonal gifts for friends and family.

Why You’ll Love Yarn Pumpkins
Yarn pumpkins are one of those fall crafts that combine beauty, affordability, and simplicity. They look high-end when styled on a mantel, coffee table, or dining table, but they’re made from inexpensive supplies. The cozy texture of yarn pairs perfectly with other fall decorations like wood accents, brass candlesticks, and natural elements such as pinecones or dried flowers. Plus, you can tailor them to match your décor by choosing yarn in colors that suit your fall palette.
I love that this project finally allowed me to incorporate yarn into my autumn decorating in a creative new way. They add the same cozy warmth as a blanket or pillow but in a playful, seasonal form.
I hope you’ll give these DIY yarn pumpkins a try this season! They’re easy, fun, and such a beautiful addition to any fall display. If you make them, I’d love to see how yours turn out. Be sure to follow me on Instagram at @returninggrace and tag me in your photos or leave a comment to share your version of this project. Let’s celebrate the cozy beauty of fall together!