

I love making handmade gifts, especially during the holiday season. There’s something so meaningful about giving a gift that you’ve made yourself. Even if it’s something small, a thoughtful gesture like a homemade treat shows how much you care. These homemade chocolate bars are a perfect example. Made with simple ingredients, wrapped in parchment or cellophane, and finished with a charming free printable gift tag, they’re a sweet and elegant way to celebrate the season. And the best part? They’re incredibly easy to make using a microwave-safe bowl, a silicone mold, and a few pantry staples from your local grocery store.
Whether you’re gifting these homemade candy bars to teachers, neighbors, friends, or using them as party favors, this is one of those recipes you’ll come back to every year. Let’s walk through how to make your own chocolate bar gifts from scratch—no double boiler required!
Ingredients and Supplies for Homemade Candy Bars
Just a few ingredients

other supplies
Homemade Candy Bar Supplies
- Silicone chocolate bar mold
- Wax or parchment paper
- 2 microwave-safe bowls or batter bowls
- Mini whisk
- Knife for spreading
Gift wrapping supplies
Gifting Made Easy
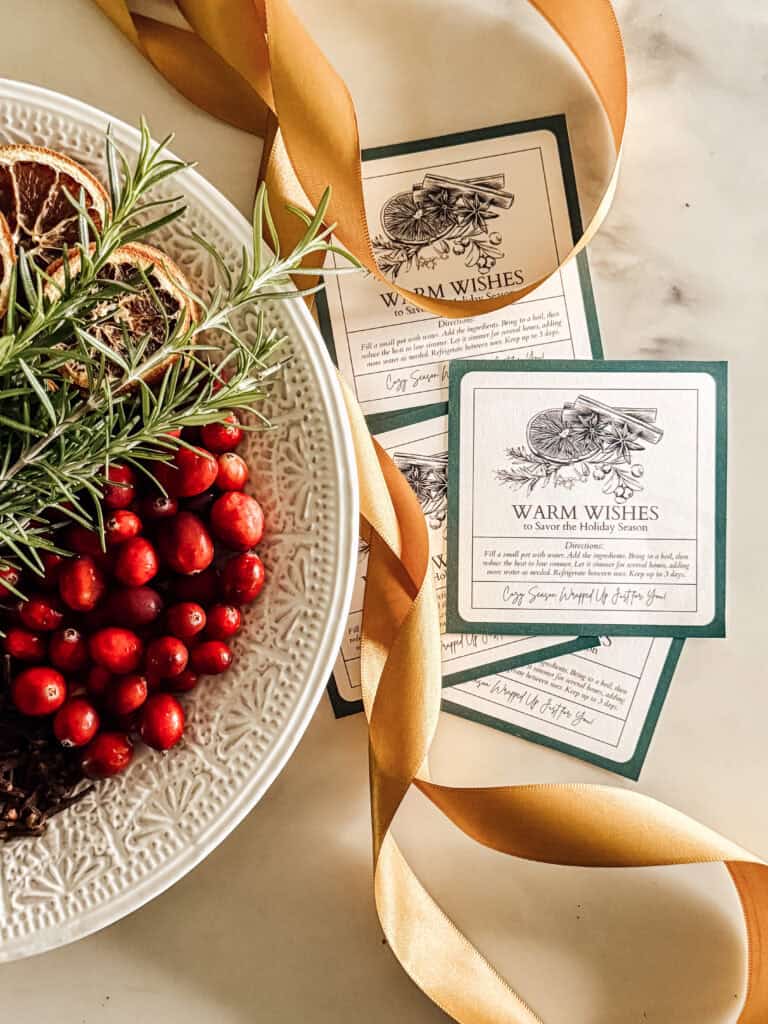
Add the perfect finishing touch to your chocolate bars with my free printable gift tags!
free printable gift tag

Shop the post

Allergy Information
Contains Pecans: This recipe includes chopped pecans as one of the topping options and other products may contain other allergens. Please omit or substitute with care if giving to someone with nut allergies and read all labels carefully. Always label homemade treats if they include common allergens.
Step-By-Step Instructions for Homemade Chocolate Bars
01
Melt the Chocolate Almond Bark
Chop the chocolate almond bark into smaller chunks and place them in a microwave-safe bowl. Microwave in 30-second increments, stirring between each round to prevent burning. In my microwave, the chocolate is fully melted in about 1 minute and 30 seconds. Stir with a mini whisk or rubber spatula until smooth and glossy.

02
Fill the Silicone Mold
Once the chocolate is fully melted and smooth, carefully pour it into the sections of your silicone chocolate bar mold. Try to distribute it evenly across each cavity.

03
Spread the Chocolate Evenly
Use a small knife or rubber spatula to gently spread the chocolate into all corners of the mold. This ensures the top and bottom of each bar are evenly filled and smooth.

04
Repeat with the Vanilla Almond Bark
Repeat the same melting and pouring process using the vanilla almond bark. Use a separate microwave-safe bowl to melt the white chocolate and pour it into the remaining sections of the mold.

05
Tap the Mold to Release Air Bubbles
Once both types of chocolate have been poured and spread, gently tap the mold on a flat surface to help release any trapped air bubbles. This will give your bars a smooth finish once they’re set.

06
Add the Toppings
While the chocolate is still soft, sprinkle your toppings over the surface. This is a great time to get creative—use sprinkles, crushed peppermints, chopped pecans, or any combination of your favorite add-ins.

07
Let the Bars Cool at Room Temperature
Set the mold aside in a cool, dry area and allow the chocolate to fully set. This usually takes about 4 hours at room temperature. Avoid refrigerating the mold, as it can cause the chocolate to bloom or form condensation.

08
Remove from Mold and Wrap for Gifts
Once fully set, gently remove each bar from the silicone mold. They should pop out easily. From here, you can enjoy them as is or wrap them up for gifting!

Wrapping the Bars for Gifts
These homemade chocolate bars are just as fun to wrap as they are to make. Here’s how to package them beautifully:
- Wrap each bar in parchment paper or slide it into a clear cellophane bag to show off the toppings.
- Tie with a bit of twine or ribbon for a cozy, handmade-inspired look.
- Punch a hole in the corner of your free printable tag and tie it on with a bow.
- Place bars in a basket, small box, or line them up on your holiday table as party favors or stocking stuffers.


Why I Love Using Almond Bark for Melting
Almond bark is the main ingredient that makes this homemade chocolate bar recipe so simple. Unlike traditional chocolate, it melts beautifully in the microwave and doesn’t require tempering or a double boiler. It has a smooth, creamy texture and a pleasant flavor that’s perfect for gifting. Plus, it stores well in an airtight container, so you can make these homemade chocolate candy bars ahead of time without any worries. I also use almond bark for other seasonal treats like my spring bunny bark!

Alternate Topping Ideas
One of the best things about making your own chocolate bars is that you can completely customize the flavor. Here are some fun topping combinations to try:
Feel free to get creative with your favorite candy bar flavors or seasonal ingredients. The possibilities are endless!

Tip for Bigger Batches
Want to make a larger batch of chocolate candy bars for a party or holiday event? Pick up multiple candy bar molds so you can pour several at a time. It’s a huge time saver when prepping for a crowd!

More Helpful Tips
- Use parchment under your mold while filling to catch any spills.
- Store completed bars in an airtight container at room temperature for up to two weeks.
- Don’t overheat the chocolate. Short bursts and stirring are key to smooth melting.
- If using add-ins like peppermint extract or oils, add them after melting to preserve texture.
- Let bars set in a cool, dry place. Avoid refrigerating to prevent cloudiness on the chocolate.

Answers to Your Questions About Homemade Candy Bars
Can I use regular chocolate chips instead of almond bark?
Yes, but you’ll need to temper the chocolate or it may not set properly at room temperature. Almond bark gives the best results for beginners.
Can I freeze the bars?
While you can freeze them, the texture may change slightly once thawed. It’s best to store them in a cool pantry in an airtight container.
Can I use different types of molds?
Absolutely! Just make sure your chocolate mold is food-safe and flexible for easy release. Silicone molds work best.
What if I don’t have a microwave?
You can melt the chocolate using a double boiler over the stove. Just be sure to stir frequently and melt slowly.

These homemade chocolate bars are the perfect blend of simple, sweet, and thoughtful. With just a few ingredients and some charming packaging, you’ll have beautiful handmade gifts ready to go for the season. Whether you’re gifting one to a teacher, wrapping up party favors, or adding them to your holiday cocoa bar, they’re sure to delight.
I hope this homemade chocolate bar recipe becomes one of your new seasonal favorites! Don’t forget to download your free printable gift tags to complete the look. If you give these a try, tag me on Instagram @returninggrace or leave a comment below—I’d love to see how yours turn out!
And if you haven’t already, be sure to subscribe to my email list so you don’t miss out on more handmade holiday inspiration, seasonal recipes, and free printables all year long.

Subscribe to get all the latest projects delivered Right to youR Inbox!

Pin for Later


Equipment
- Silicone chocolate bar mold
- Wax or parchment paper
- 2 microwave-safe bowls or batter bowls
- Mini whisk or rubber spatula
- Knife for spreading
- Clear cellophane bags
- Twine, baker’s twine, or ribbon
- Cardstock for printing the tags
- Scissors
- Single hole punch
- Free printable gift tags (available on my site!)
Ingredients
- 12 oz Vanilla Almond Bark
- 12 oz Chocolate Almond Bark
- 1/4 cup white sprinkles or nonpareils
- 1/2 cup chopped pecans
- 1 cup crushed candy canes or peppermints
Instructions
- Melt the Chocolate Almond Bark – Chop the chocolate almond bark into smaller chunks and place them in a microwave-safe bowl. Microwave in 30-second increments, stirring between each round to prevent burning. In my microwave, the chocolate is fully melted in about 1 minute and 30 seconds. Stir with a mini whisk or rubber spatula until smooth and glossy.
- Fill the Silicone Mold – Once the chocolate is fully melted and smooth, carefully pour it into the sections of your silicone chocolate bar mold. Try to distribute it evenly across each cavity.
- Spread the Chocolate Evenly – Use a small knife or rubber spatula to gently spread the chocolate into all corners of the mold. This ensures the top and bottom of each bar are evenly filled and smooth.
- Repeat with the Vanilla Almond Bark – Repeat the same melting and pouring process using the vanilla almond bark. Use a separate microwave-safe bowl to melt the white chocolate and pour it into the remaining sections of the mold.
- Tap the Mold to Release Air Bubbles – Once both types of chocolate have been poured and spread, gently tap the mold on a flat surface to help release any trapped air bubbles. This will give your bars a smooth finish once they’re set.
- Add the Toppings – While the chocolate is still soft, sprinkle your toppings over the surface. This is a great time to get creative—use sprinkles, crushed peppermints, chopped pecans, or any combination of your favorite add-ins.
- Let the Bars Cool at Room Temperature – Set the mold aside in a cool, dry area and allow the chocolate to fully set. This usually takes about 4 hours at room temperature. Avoid refrigerating the mold, as it can cause the chocolate to bloom or form condensation.
- Remove from Mold and Wrap for Gifts – Once fully set, gently remove each bar from the silicone mold. They should pop out easily. From here, you can enjoy them as is or wrap them in parchment or clear cellophane for gifting. Add ribbon and one of my printable gift tags for a sweet handmade touch!


